

Before you get to spray tanning clients with your brand new Fuji Spray T-Pro Bottom Feed Applicator, let’s get familiar with understanding the different control knobs of your shiny, new gun and what they do!
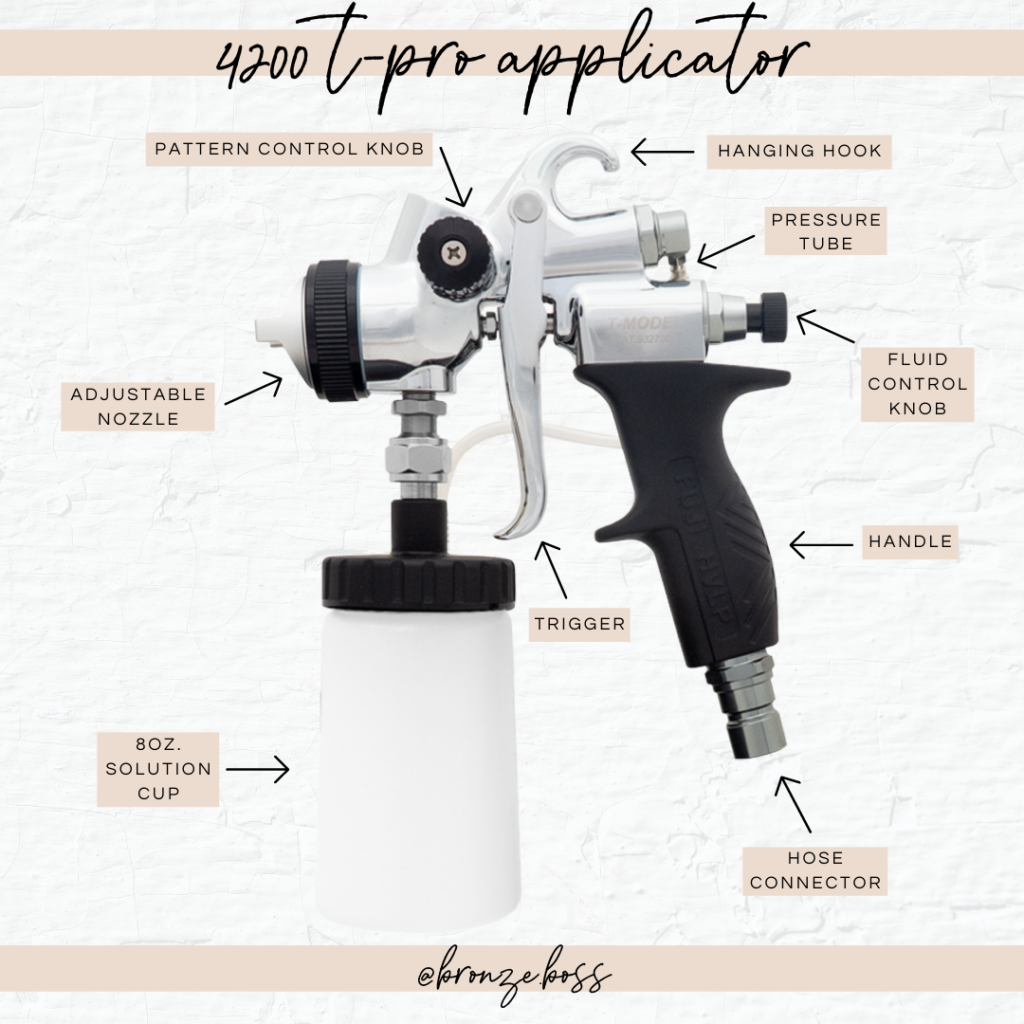
First things, first! If you do not yet know the parts of your new gun, take a moment to familiarize yourself with the main parts of your gun using the image below. It’s important to know each and their function so that you can set your gun up with ease.
Now that you are aware of the parts of your applicator gun, let’s work step-by-step to both calibrate and find your settings so you can get to spraying those clients!
Step One
Fill the applicator cup with water and spray away to flush out any debris that could have accumulated during assembly or shipping. This is important to do anytime you invest in a new gun to avoid your applicator from becoming clogged or your solution from spraying spotty.
Step Two
We are going to set your adjustable nozzle. This will depend if you prefer to spray with a horizontal or vertical application.
- If you plan to spray your clients in an up and down motion, you will want to set the notches of your nozzle to a 12 and 6 position so that your solution sprays in a horizontal fan.
- If you plan to spray your clients in a side-to-side motion, you will want to set the notches of your nozzle to a 3 and 9 position so that your solution sprays in a vertical fan.
Step Three
Your pattern control knob setting will determine if your fan pattern will spray as a wide fan shape for full-body application or in a circle shape for contouring.
- Rotate the knob backwards towards you to set in a wide fan shape for full-body application.
- Rotate the knob forwards away from you to set in a circle shape for contouring.
- Rotate the knob halfway in-between both settings to close up the wide fan shape to help reduce overspray.
Step Four
Lastly, your fluid control knob will determine the amount of solution that will be released when pulling back the trigger. Keep in mind, there is no single setting that fits all for this specific part of your spray tan gun. This setting will be based off the following factors:
- The viscosity of your solution.
- Using a thin solution? Close your gun.
- Using a thick solution? Open your gun.
- The speed at which you spray.
- Slow sprayer? Close your gun.
- Fast sprayer? Open your gun.
- The distance at which you spray from your client.
- Close application? Close your gun.
- Distant application? Open your gun.
When you turn the fluid control knob all the way to the right, the airway will be fully closed and no solution will be released. On the other hand, when you turn the fluid control knob all the way to the left, the airway will be fully open and a lot of solution will be released.
Generally, what you’ll want to do to find your preferred setting is to fully close the gun to start and open by one full turn. From here, depending on the above factors, you can slightly close or open the gun by turning a quarter of a turn until you find the “sweet spot,” that works best for you! Be sure to take note of the number setting on the knob so you can find your setting again after giving your gun a deep clean.
Need a visual? See the below video and set your gun with me as you watch!
Happy Gun Setting, Bronze Boss!


Comments +